Once in the garden or in the country, I want to fully relax not only from the bustle of the city, but also from everything that connects us with the city. It is unlikely that anyone can consider asphalted paths a decoration of a modern manor landscape. Meanwhile, it is garden paths, patios and courtyards that occupy one of the leading positions in landscape design. Why not use the well-established paving stones as a cover for garden paths, especially since laying paving stones with your own hands is not such a difficult task. And we will tell you about the technology of this process.
What is generally called pavers?
Initially, paving stones meant basalt or granite, which was used not only for paving garden paths, but also for laying sidewalks and pavements. By the way, unpaved granite with a flat surface was used for pavements. The bars should have the same shape and size. Nowadays, for paving large areas, chipped and sawn rectangles that have undergone additional grinding are used.

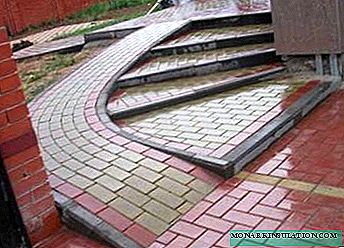
On such paths from paving stones I want to walk. They fit perfectly into the overall landscape design, becoming its integral part
Paving stones are still in demand, only it has become much more diverse, although products from it are also characterized by a fair strength and constant attractiveness.
Inexpensive concrete coating
The main and undoubted advantage of paving concrete is low cost with good consumer properties. This option is most often used for paving garden paths. In the manufacture of elements of this coating, concrete is used, in which plasticizers and various types of colored pigments are added. Such paving stones are produced either by vibropressing or by vibrocasting.

Despite the fact that concrete paving stones are relatively cheap, a very beautiful covering for garden paths can also be created from it.
Non-freezing clinker brick
Distinctive features of clinker pavers are its durability, strength and resistance to low temperatures. This coating is based on clay. At its core, such a product is a brick. The shape and color of it can be very diverse.

Paving from clay looks very, very attractive. Its precise geometry allows you to create panels that are absolutely unimaginable in beauty
Ancient stone variety
Stone is a classic of pavers. Depending on the appearance, stone pavers are divided into chipped, sawn-chipped and simply sawn. It can be granite, and basalt, and even marble. Such a coating can survive the master who built it. For garden paths, siltstone or sandstone can be used. If such stones seem too expensive for you, use a cheaper artificial stone.

Granite paving stones look advantageous both on a rainy day and on a sunny day. A feature of this coating is its durability.
Benefits of using this coating
Among the many advantages of this coating, we identified only the main ones, which we hasten to immediately list:
- appearance appeal;
- compressive strength;
- durability;
- resistance to changes in temperature, moreover, we are talking not only about frosts, but also about heat;
- resistance to abrasion and mechanical damage.
Cobbles can be paved not only with garden and country paths, which are intended for pedestrians, but also with transport platforms, for example. If significant loads are expected, lay the coating on a concrete base. This will not allow the stone to deform.

Still, the amount not invested in the paving stone itself determines the appearance of the track, but with what skill and love the work was done
Types of paving stones and style solutions
Three main types of paving are used:
- in regular rows;
- arcuate;
- arbitrary.
But the number of subspecies can not be calculated: herringbone, pigtail, checkerboard, scales, fan, circle and other ways worthy of a special story. After all, there are aesthetes who are able to create a national, floral or floral ornament, intricate Arabic script, cosmic plots of incredible beauty from pavers. Such a creative activity as laying paving stones with your own hands can captivate, but it is important to remember that paved paths are part of the general landscape design.
For paths in the garden and in the country, the most often used is paving chipped or sawn-chipped type of irregular shape and small size (7 × 7 × 5 cm or 5 × 5 × 3 cm). It is used to make small ornaments. If you plan to make a simple geometric pattern, you can take for this purpose a tile measuring 20x10x4.5 cm from clinker brick. Embodying a natural or natural style, use the paving stones, which are made from natural stone.

The fantasy of this master is unlimited, so the garden and cottage can look, decorated with such paths, festively even in gloomy late autumn

Creating beauty does not have to use many colors. Clinker bricks in just two colors can produce just such a laconic luxury
Cobblestone paving technology
Do you want the covering of garden and country paths to be durable? Follow the styling technology.
Stage # 1 - preparatory work
The plan of your site should be transferred to graph paper. We mark on it the place of laying pavers. Now, knowing their length and total area, we can calculate the need for paving. Do not forget to add to the received figure 10% for a probable marriage. You need to buy sand, cement and gravel or gravel. Do not forget about geotextiles. Now you need to mark the terrain using pegs and a nylon cord. Pegs need to be driven in no less than 1-1.5 meters apart.
Stage # 2 - take out the soil, prepare the foundation
We take out the soil to such a depth that the future surface of the track coincides with the ground level or is just above it. Otherwise, the water that forms after rain will accumulate in the paved areas and stagnate, or it will have to be removed. So, we consider the thickness of future layers of sand, gravel or gravel and add the height of the bar itself. The calculated value of the depth of excavation has come out.

Something like this should look in the context of the track that we create with our own hands. Based on the thickness of each of the layers, you can determine the depth at which you have to take out the soil
We are preparing the foundation, not sparing this time and effort on this procedure. The earth needs to be properly leveled, removed from it all unnecessary pebbles and rhizomes of plants. We achieve a flat surface, for which we fill up all the pits, and squeeze the tubercles. Then we tamp the soil. If you do not have a special tool for this purpose, you can do it yourself.
The soil must be covered with geotextiles: weeds will not germinate through this fabric and spoil your path. On dense soil, you can use 10-20 cm of sand as the first layer. It is better to strengthen loose soil first with gravel, the layer of which will be 10-15 cm. In any case, the laid layer should be well compacted. According to experts, it is even better to use crushed stone as the first layer to avoid further deformation of the paving stones.
Particular attention should be paid to those areas that have a complex topography. In this case, cementing or concreting cannot be avoided. Cement mortar is made on the basis of one part of cement and three parts of fine sand. A four or five centimeter cement pillow will be enough. You can consider another coating option in the photo below.

Another option for sequential laying of layers, which should be located under the paving stones. Do not forget that rainwater should drain from the track: a slight slope to the edges will not hurt
Stage # 3 - Curb Edging
With a border, any work looks neat and complete. For this purpose, it is better to buy ready-made borders that are used when performing construction work. And you can take paving stones, just choose a larger size.
If the track needs a border, you can dig an additional trench along the stretched nylon cord. The cement mortar should be poured into the trench as the curb elements are placed in it. Each component of the future edging of the track should fit snugly against the previous one, and the edge of the curb should be in contact with the stretched cord. There is a special rubber mallet - a mallet, which will have to tackle the curb so that it stands up as you intended.

The curb can be laid with the adjoining trim board. This is a very convenient way in which the geometry of the structure is completely safe.
It is very convenient to strengthen the curb with a trim board. First, you can fix it in the dug trench, so that later, right next to it, place a curb stone or tile.
Stage # 4 - laying the main canvas
Do not rush to start laying paving stones; let the curb dry for at least a day. If you have a sandy "pillow", you need to spill sand abundantly with water before laying pavers. There are many ways to lay paving stones.
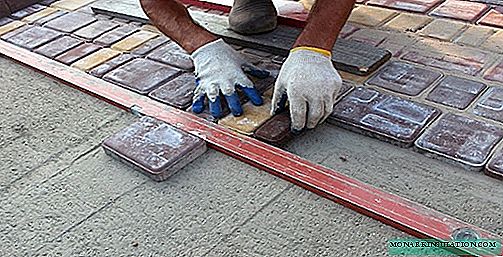
Before you put the paving stones, you can first knock down the box from the edged boards. Recommended size - 1x0.7 meters. They are installed and strengthened on a pillow, after which they begin the paving process. Paving stones are placed tightly according to a previously developed pattern. Remember to use the level to check the quality of the work done. Knock down the coating elements should be using paving stones.

The use of threads or wooden boxes helps to maintain the geometry of the picture, not to go beyond the intended size, which is especially important for large volumes of work
If you need to cut an element into the necessary pieces, use a grinder equipped with a diamond blade. This can occur during the design of complex areas around an object: a porch, a garden sculpture or a reservoir. If you have a vibratory ramming tool with a rubber base, in order not to damage the paving stones, use it: the surface should be tight.
A track can be not only complicated by its special ornament. This is done on several levels, which requires special skill.
Track finishing
A layer of wet sand should be applied to the paved surface of the track, then simply rub it into the joints with a hard-mop. The work is completed.

Finishing of an already finished track is carried out by a method well known since antiquity. After that, the work can be considered fully completed.
Now you can see how the paving stones, laid by your own hands, decorate the garden in the first neat path with a curb. If everything is done right now, then the second bridge will be easier for you.
Video with examples of installation work
Video # 1:
Video # 2: