Closed and open, stone and brick, with windows on the wall and half-shaded - the verandas have long been transformed from small buildings that play the role of utility rooms into spacious and functional rooms. If desired, the additional area becomes both a summer dining room and a refuge on a hot day, and, subject to careful warming, a winter garden. It is difficult to say exactly what the porch should become: you can create with your own hands both a modest extension and a luxurious hall.
Types of designs and the correct location
The veranda is never considered as a separate building: it is part of the house, which is attached to the main building during the construction process or after some time. Most often, it adjoins the facade or the front side, that is, to the wall into which the door is mounted. Thus, to get into the house, you must first go to the veranda.
Traditionally, extensions are divided into two types:
- open - the upper half of the walls is absent, and the roof is held on beams;
- closed - the space free from walls is glazed (in some cases, the area of the glass coating prevails over the area of the wooden part).
When designing the location and appearance of the extension, one should keep in mind harmony: the veranda should merge with the house, match its style, be built of similar materials, and be sized. The optimal length of the room is 4-7 m, width is 2.5-3.5 m. A smaller area is not enough, and a large one will look bulky.

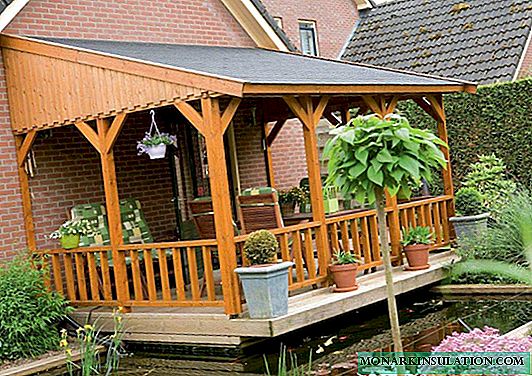
Open verandas combine a porch and an equipped sitting area. Wooden furniture, railings, floral decorations create homeliness, although the building is, in fact, on the street

A small covered veranda serves as an entrance hall or dining room, especially in the summer. Here you can not only meet guests, but also chat with them over a cup of tea, sitting comfortably in an armchair

An open veranda is a great place for a summer vacation. There is everything to have a great time: fresh air, nature, comfortable furniture and a saving shadow
Usually, even closed rooms are not heated, so the veranda is often used in the warm season. Before starting construction, it is necessary to conduct a series of preventive measures.
Preparatory stage: documents and selection of materials
The future should be taken care of in advance. It is possible that in a few years it will be necessary to sell, donate or rent a country house, and then documents that confirm the legality of the extension will be needed. Otherwise, you will have to pay a fine and get the same papers, but in a more complicated and long way.
First of all, you should contact the design organization so that, according to the provided sketches, they make a drawing and a draft of the future structure. In this case, it makes no difference how the porch is built in the country: with your own hands or with the help of a construction organization. With the finished project, application, passport and documents confirming the ownership, you will have to visit several important authorities and wait for approval, after which you can proceed with the construction. The final legal touch is a new home registration upon completion of work.

Before visiting the design organization, you should create a sketch of the proposed porch, where you must specify the exact dimensions and location of the doors and windows
In addition to the documentary side, there is also a financial one - the purchase and preparation of building materials. The main principle is compliance. For example, if the house is built of glued beams, then the annex should also be made wooden. The veranda attached to the brick building must be fully or partially made of brick. Such combinations as brick and foam blocks or wood and siding are absolutely unacceptable.
The main stages of construction
One of the options suitable for self-construction is a wooden frame veranda of a closed type. Foundation, walling, roofing do not require large material investments and the use of construction equipment.

Scheme of the components of the veranda: 1 - racks; 2 - pillars of the foundation; 3 - lower harness; 4 - drain; 5 - pickup; 6 - double-glazed window; 7 - lining; 8 - upper harness.
Do-it-yourself drawings of the veranda will help to provide for any nuances and avoid mistakes. For example, the number, size and location of the glass units should be calculated in advance.
Step # 1 - erecting a columnar foundation
After the top layer of soil has been removed and markings have been made, the construction of the foundation is started. It is great if it will be an analogue of the foundation of the house, but this is not always possible. The simplest and fastest is the columnar option.

For the installation of columns, various building materials are used: red solid brick, white silicate brick, concrete blocks, reinforced concrete beams, home-made concrete structures
Work sequence:
- along the perimeter (necessarily - in the corners) of a future extension, dig holes for pillars 1 m deep;
- gravel-sand cushions are arranged at the bottom of the pits;
- waterproofing (bitumen);
- make a 15-centimeter concrete base;
- erect pillars of bricks with ordinary masonry.
The height of the pillars is calculated based on the height of the floor of the house. So that at the end of construction the roof of the veranda fits under the overhang of the roof of the building, the floor of the veranda is about 30 cm lower than the floor of the building.
Step # 2 - mounting the frame
Creating a strong and stable frame for attaching wall elements is an important stage in the construction of a wooden porch with your own hands. The lower and upper strapping is performed, the material for which are logs (diameter 12 cm) or beams (8 cm x 8 cm, 10 cm x 10 cm). The connection is via a “direct lock”.

It is better to start the construction of the extension frame with more powerful corner elements, gradually moving on to the rest of the details - vertical and horizontal beams
Arranging the lower double strapping, cut logs at the level of the 2nd log and install racks, which are fixed with metal brackets and nails. In the upper part, a second strapping is equipped and the rafters are installed. The upper ends of the rafters are connected to a beam located under the slope of the roof of the building. To connect horizontal elements and racks using bolts.
Step # 3 - building walls and roofs
How to upholstery the walls of the veranda so that the frame can withstand the weight of the structure? For this, relatively light materials are used - lining or boards. Each type of wood material has its own installation features. For example, with a horizontal arrangement of elements (which is preferable), the lining is fitted close to the strip to the strip, and the boards are overlapped.

If the veranda is being erected simultaneously with the construction of the house, use a whole roofing: the roof of the house smoothly passes into the roof of the veranda
Thermal insulation material is laid on the inside, which is sold in the form of plates or rolls. The decoration of the premises is carried out using drywall or chipboard panels. There are many options for decorating the interior: the design depends on the purpose of the veranda.
The roof configuration of the extension has several options, but the most popular is the single-type roof type - simple in execution and, as a rule, perfectly combined with the roof of the house. The rafters are located at an angle: the upper ends are fixed under the ramp, the lower ones rest on the walls.

There are two options for designing ceiling ceilings: in the first case they are sewn up with boards, in the second - they are left open
As the roofing, use the same material that was used to equip the roof of the building. It is important that the texture and color match. Usually, when they build a veranda with their own hands, they use material that is easy to install, for example, soft tiles, metal tiles or roofing material.
The procedure for laying roofing material:
- boards are fixed to the rafters so that a dense flooring is obtained;
- overlapping rolls of canvas roofing material, fixing the edges with galvanized nails;
- additionally fix the coating with rails located at the same distance from one another;
- the lower edge of the roofing is bent and pinned.
Step # 4 - shaping the floor
The best material for the floor is a wooden treated board with a thickness of about 30 mm.

Choosing a tone for painting a wooden floor, most often they stop at translucent paintwork, preserving the natural texture of the wood
The width may be different, but usually take products about 85-120 mm. Boards are placed on the logs using a heat-insulating layer. The top surface of the floor should be flat and smooth. Each part is treated with a protective agent, and after laying it is coated with paint or varnish.

Closed veranda - full housing, protected from weather troubles. Having thought over the corresponding interior, it can be turned into an office, a relaxation room, a dining room or a playroom for children
Video examples of the construction of such buildings
The veranda in the country can be built using ready-made double-glazed windows. Their sizes depend on the total area of the room and the degree of illumination. The larger the glass, the easier the finished building looks. Particularly good are the sliding constructions that make it possible to turn a closed veranda into an open one in warm time.