In the spring, you can carry out all types of trimming: sanitary, thinning, shaping and transfer to branching. But it is better to remove the old thawed stems from the fall or immediately after fruiting. If this was not done last season, then in spring there will be twice as much work in the raspberry.
Proper pruning is the key to a good harvest.
Spring pruning is a must for raspberries. Her goal is to remove all dry, frozen and weak stems. As a result, raspberries will be better blown by the wind and illuminated by the sun. The strong and viable shoots remaining in the bushes will get more juice, they will be less sick and will bring more large and sweet berries.

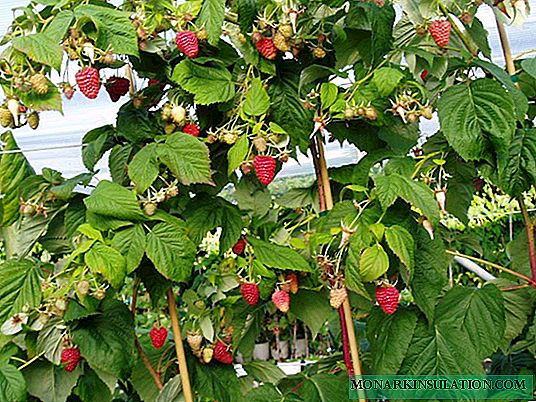
Raspberries respond to good care with abundant fruiting
In spring, only ordinary raspberries are cut, which bears fruit on the shoots that grew last year. In remontant raspberries (fruiting on both biennial and annual shoots), all stems are cut at the soil level in the fall.
When to start pruning
The most difficult thing in pruning raspberries is not to confuse the old non-viable stems with the young and not to cut the excess. In spring, all shoots are lignified, which makes them seem the same. Therefore, it is recommended to clean old thawed branches immediately after harvest, when they still have empty brush of berries, and annual shoots have green stems and are not covered with bark. If the moment is missed and spring has come, then there is nowhere to put off.

In summer, after fruiting (left), the old shoots are easily distinguished by the presence of bark; in spring (on the right) all shoots are already lignified, it is difficult to find old ones among them
How to prune raspberries in spring
Start trimming dead wood before starting sap flow, until the buds open. Old stems can be distinguished by exfoliating cracked bark. In addition, they differ from the young in a slightly different shade - they can be lighter or, conversely, darker. But the surest sign is fragility, which has already outlived its two-year-olds, they easily break. If you try to break the young shoot, it will bend, while the old one does not bend at the very base, but breaks out with a crunch. But it is better to carefully cut such stems near the ground. If they cling to neighboring young ones, cut them into several pieces.
In hardware stores you can find special gloves for working with prickly plants: roses, raspberries, gooseberries.
The next step is to shorten the young shoots to healthy wood. Everything is simpler here: wait for the leaves to appear; usually on the tops of the shoots the buds do not bloom, which means that last summer they did not ripen and froze in the winter. Such tops need to be cut to the nearest leaf or to a height convenient to you. Some varieties give very high shoots, which are bent by an arc in summer, creating a large shadow. By shortening all the shoots in the spring, for example, to the level of the chest, you will stimulate the growth of side branches, and they will also have berries. As a result, raspberries will be low, but lush and more productive.

The top of the shoot with unopened buds needs to be cut
After trimming the old shoots and frozen tops, inspect your raspberry from the side. There are two traditional ways to grow raspberries:
- Bush - raspberries in a row grows bushes, the distance between them is 70-100 cm, each with 5-7 shoots.
- Ribbon - shoots stand in one line, with gaps between them 10-15 cm and up to 30 cm, if the stems are branched.

On the left - raspberries planted with bushes (several shoots come out of one root), on the right - tape planting (shoots are arranged in one line)
In both cases, the distance between such rows is 1.5-2 meters. Determine which pattern is easier to bring your landings and make appropriate thinning. At the same time, try to remove the weakest shoots: thin, short, curved, with spots on the stems, with the least number of buds that have opened. Such thinning can be carried out before trimming the tops, but not until the buds open. After the appearance of leaves, it is easier to navigate - you will not remove strong and viable shoots instead of dry and sick ones. In addition, this will not be your first raspberry pruning for the season, you will beat your hand dry and thin out as correctly and accurately as possible.
Video: spring raspberry pruning secrets
Why raspberry trellis
When your raspberry-tree as a result of trimming takes on a cultural appearance, all that remains is to tie up the shoots. Any variety needs a garter, even if its description says that this procedure is optional. And if you shortened the shoots, they stand straight, they still need to be fixed to the trellis. In the spring, the stems look compact and strong, but in the summer they will overgrow with foliage, branches, and will begin to be covered with berries. Under the weight of all this, with the assistance of rains and winds, shoots, even short ones, will bend to the ground, and some will lie down. Tie up such raspberries without damaging the leaves and fruit twigs will be difficult.
In addition, on the trellis raspberry shoots are evenly distributed, do not obscure each other, so everyone is well lit and warmed by the sun, and flowers are easily accessible to pollinators. So, the garter also affects productivity. Therefore, immediately after pruning, while the stalks have not yet overgrown with greenery, build a trellis and tie up raspberries.

One garden, the same raspberry variety: on the trellis (left) and without garter (right) - the difference in yield is clearly visible
How to tie raspberries
The simplest type of trellis is two supports (at the beginning and at the end of a row) and a wire or polypropylene twine stretched between them. It is easier to use metal pipes or thick reinforcement as supports. Wooden columns among greenery look more beautiful and more appropriate, but they are short-lived. If the rows of raspberries are long, then the supports should be installed every 3-5 meters.

The trellis consists of supports and a wire stretched at different levels
Trellis device:
- Prepare supports with a height of 1.5-2 meters; drive each into the ground by 0.5 m.
- Between the supports in 2-3 tiers, pull the twine or wire. The lower tier should be located about 50 cm from the ground, the second and third - every half meter from each other. With this scheme, you can tie up shoots of different heights.
Video: Raspberry Trellis
The wire or twine can be pulled in a single row or twisted around a column and stretched in the opposite direction. In the second version, shoots are wound between two wires and fixed.

The wire is stretched in two rows, between the bushes intercepted by brackets
With this scheme, the shoots are not fixed strictly, they can bend to each other and obscure. Tie each stalk in place. To do this, it is easier to use pieces of wire in a soft shell. The lignified shoots of raspberries will no longer grow in thickness, so you can tie them more tightly.

The shoots are fixed on the trellis with pieces of soft wire.
Garter to the trellis seems time consuming, but it will be easy for you to take care of raspberries all summer: watering, weeding, loosening and harvesting.
When pruning raspberries, you plan its yield. The main thing is not to cut out strong and promising shoots, but you can’t leave too many unnecessary. Each stalk should receive enough nutrition from the roots, be well lit by the sun and ventilate.