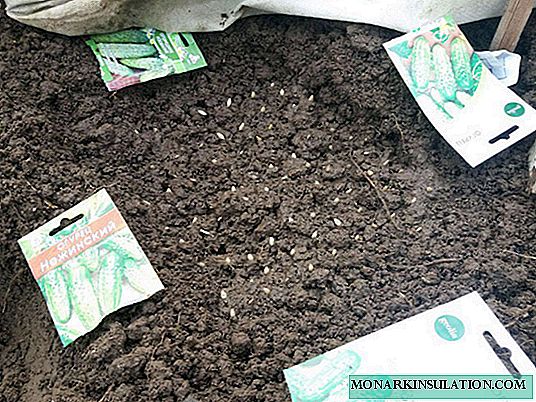
Not every summer resident is lucky to have their own house near the reservoir, where after physical work you can relax and enjoy the cool water. The rest have to either get in the car and go in search of the nearest river, or make a pool with your own hands in the country. More often they choose the second option, because in addition to relaxation, the pool also gives side benefits:
- warm, settled water, which can be watered with flower beds and a garden (if you have not added chemical disinfection agents to the pool!);
- the ability to switch children who are passionate about tablets, mobile phones and laptops to a healthier vacation;
- body improvement, etc.
It remains to choose from a variety of options for stationary pools the one that is suitable for the needs of the family and the landscape of the site.
Choosing a place to build a pool
To simplify the maintenance of the constructed pool, at the planning stage, consider the following points:
- It is better if there is clay soil on the pool site. She in case of breakdowns of waterproofing will stop the leakage of water.
- Find a place with a natural slope of the soil. So you make it easier for yourself to dig a pit and immediately decide in which place to put the drain system.
- Tall trees should not grow near the future pool, because their root system, having felt the proximity of moisture, will reach the walls of the structure and can ruin the waterproofing. The most "aggressive" are poplar, chestnut, willow. If trees already grow on the site, you will have to part with them in advance. It is cheaper than repairing a damaged pool.
- Low trees are also undesirable, because you have to constantly remove the leaves from the bowl, and during flowering, the water turns yellow from pollen.
- Pay attention to which side in your country house the wind most often blows, and try to place the pool so that the air moves along the bowl. Then all the dirt and debris will be nailed to one wall, at the edges of which it is recommended to put a drain system.
- Try to place the pool closer to the water supply, so that it is easier to fill it.
Preliminary calculations - sizing
The width and length are determined based on the purpose of the pool. If it is designed for swimming, then choose a rectangular shape, making the bowl elongated. If for relaxation, splashing and rest of the whole family, it is more convenient to communicate in round bowls.
A more important criterion is depth. It is believed that in order to feel free, it’s easy to swim, turn around underwater and jump from the side, you need a meter and a half depth (and no more!). But ski jumping requires a deeper bowl - at least 2.3 m. However, it is enough to make such a depth in the diving zone, creating a smooth transition from the main size (1.5 m).
If the construction of the pool in the country is conceived exclusively for children's recreation, then the depth of the bowl should not exceed half a meter. This is enough for fun games and floundering without risk to health.
The most complex design is a combined pool, in which everyone will bathe. In this case, a different depth is created for the children's and adult zones, and both zones should be separated by a solid partition that starts from the bottom. So you make sure against accidental children entering the adult area.
Important! In any pool that has several different depths, it is necessary to make the bottom flat and smoothly passing from one size to another. Sudden jumps in depth are unacceptable for safety reasons. A person walking along the bottom can gape and miss the border beyond which another depth will begin, and in a panic, when the legs instantly go down, the risk of drowning is very high.
Choice of a bowl: to buy ready-made or to make it yourself?
The most time-consuming work associated with the preparation of the pit and pouring the bowl. But manufacturers have figured out how to build a pool in the country faster and easier. They created ready-made bowls, which need only be dug into the ground and fixed. In addition to the obvious plus in ease of installation, finished designs are also beneficial in that they come in all kinds of shapes and colors, which can not be said about concrete. In addition, during operation, concrete bowls can crack if soil starts to move.
Types of finished bowls: plastic and composite
There are two types of finished bowls on sale: plastic and composite. The principle of their installation is exactly the same. Only the technical characteristics of the materials differ.

A plastic bowl requires additional insulation of the pool walls from the outside
In plastic constructions, the main material is polypropylene. It is not afraid of burnout, does not require draining water for the winter, is environmentally friendly, resistant to mechanical stress. A smooth surface prevents the formation of plaque and sediment on the walls and bottom. Such bowls do not require additional interior decoration, because they look aesthetically pleasing. The only negative: if the pool is installed in a place where there is no shadow, then in the heat polypropylene can expand, which is why the bottom and walls "go in waves." But as soon as the temperature drops, the bowl takes on its usual appearance.

Composite bowls made of fiberglass, which is not afraid of either frost or heat
Composite designs lack such a problem. The main material in them is fiberglass, which is bonded with polymer resins. All the advantages characteristic of plastic bowls are also characteristic of this material. But there is a small “but”: the composite is quite expensive.
Do-it-yourself bowl options
And yet, some summer residents still prefer the bowls that are created on the spot, because you will not always find a container with a size and shape that is ideally suited to a specific landscape, and very large pools (about 10 m in length) cause difficulties in transportation. The vast majority of owners make pools for the cottage with their own hands from concrete. This material is always on sale. If it is not possible to deliver it to the site in the form of a liquid solution, an ordinary concrete mixer is placed, and a mixture with the addition of sand is created in place.

The polystyrene foam bowl is easy to assemble due to the lightness of the material and holds water temperature perfectly
It is possible to create an entire bowl of concrete, including walls, but it takes a long time and a lot of work to install formwork and pour.
Resourceful summer residents came up with a simpler device for the pool: they only kept the bottom concrete, and the walls were made of polystyrene foam blocks or steel sheets. In the first embodiment, the pool turns out to be warm, since polystyrene foam has low thermal conductivity. Steel walls are very easy to install, as they are sold ready-made with all the additional equipment in the form of cladding film and mounting hardware.
Installation of a pool with a finished bowl
Consider how to make a pool in the country, using the factory bowl.
Marking the site
- Carefully measure the bowl delivered to the site.
- We mark on the ground the place of the future foundation pit, using pegs and a rope. We drive the pegs in the corners of the future bowl, and we pull the rope between them. The more non-standard form of the pool, the more often drive in pegs.
- We retreat from the stretched rope by a meter and make outlines along the entire perimeter (we cut the ground, hammer new pegs, etc.). It is from this markup that you will begin to dig a pit. Such a reserve is needed to make it easier to lower the bowl, insulate its walls and create a solid foundation.
- We remove the internal marking and proceed to digging the pit.
Excavation

The pit of the pool should have a flat and stable bottom, so it is concreted
The foundation pit should be half a meter deeper than the size of the bowl itself. Now create the base on which to put the bowl:
- Pour the bottom with a 20-centimeter layer of coarse sand and ram.
- We spread a metal mesh on the sand for the fortress and pour concrete mortar 25 cm thick on it. We wait until it dries.

The concrete layer with which the bottom is poured must be reinforced so that it does not crack when the soil moves
After that, we insulate the pool:
- We lay geotextiles on the entire concrete base, and on it - three-centimeter expanded polystyrene plates. They will isolate the bottom of the pool from cold land.
- On top of the stel insulation, a thick durable film.
- While the bowl is at the top, you should insulate its walls. The outer surface of the walls is "packed" in polystyrene foam and insulated with polyethylene.

The outer walls of the bowl are insulated with polystyrene foam for isolation from cold soil
Bowl installation and communications connection
- Lower the prepared bowl to the bottom of the pit.
- We connect to the bowl all the necessary communications. We put a protective sleeve on the pipes and fix it with tape so that it does not move when concreting.

The spacers will not allow the bowl to bend when the concrete reinforcement of the pool is poured; And all pipes must be packed in a protective sleeve so that they do not freeze in the winter
- Concrete the remaining voids between the soil and the walls of the pool as follows:
- We install spacers inside the bowl so that the plastic or composite does not bend under the pressure of the concrete mass;
- We put the formwork, and we install reinforcement around the perimeter;
- We fill the solution not all at once, but in layers: we fill the pool with water by 30-40 cm and raise the concrete to the same height. We are waiting for solidification, then again water - and after that concrete. Thus, we bring the concrete layer to the surface of the soil.
- We wait a day until the pour solidifies and only then remove the formwork.
- We fill the voids from the formwork with sand, spilling it with water and tamping.
It remains to refine the pool area and let water into it.
For outdoor pools, it is advisable to create a hinged roof that will protect from dirty rain, or at least sew a tent, which will cover the structure when leaving the country house.
If the device of pools in the country seemed to you a difficult task - buy an inflatable or frame option. Such pools are quite suitable for water recreation, and for the winter you can easily disassemble them and hide them in the attic.